


Your trusty LED lamp suddenly refuses to turn on, leaving you in the dark. This unexpected failure interrupts your work and creates a frustrating feeling that a modern, reliable piece of tech has broken prematurely.
When an LED lamp fails, systematically check the power source first, then inspect the external cord and adapter for damage, test the switch mechanism, and if it still fails, the cause is likely an internal component like the driver.
Let's walk through these steps together, from the simple and obvious to the more complex, to diagnose the problem.
Is It a Power Problem or a Lamp Problem?
You press the power button on your lamp, and nothing happens. Your immediate thought is that the lamp is broken, but is that really the most likely place for the failure to be?
Before blaming the lamp, you must confirm the wall outlet is working. The problem is frequently external to the lamp, such as a tripped breaker, a faulty power strip, or an outlet controlled by a forgotten wall switch.
At Royelamp, our support team has a saying: "Always check the plug first." It sounds obvious, but it solves a surprising number of customer issues. I remember a case with a large corporate client who bought 500 lamps for a new office. They called in a panic saying a whole batch of 20 lamps was dead on arrival. We were preparing to send a technician, but I asked them to do one simple check first. I asked them to plug a phone charger into one of the dead outlets. They discovered that an entire circuit of wall outlets had been accidentally switched off at the circuit breaker. A quick flip of a switch brought all the lamps to life. This is a perfect example of why you should never assume the lamp is the problem without first verifying its power source. It is the single most common point of failure in the entire system, and the easiest to fix.
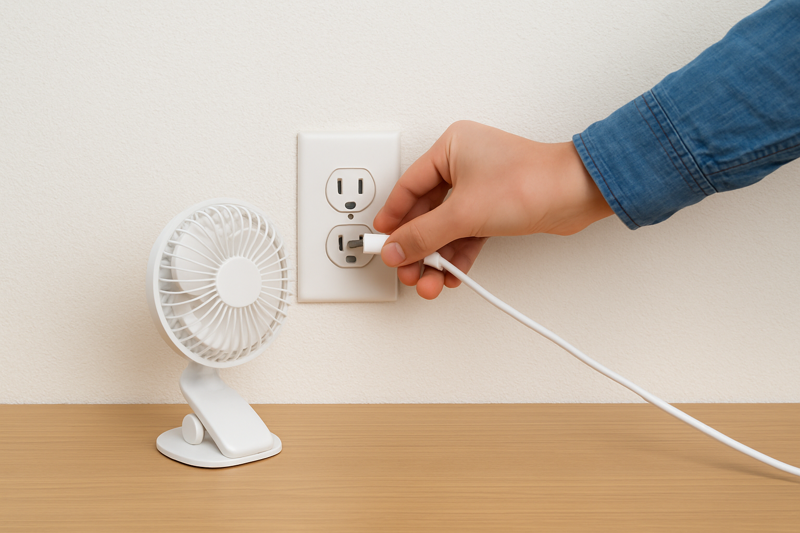
The "Known Good" Device Method
The professional way to test an outlet is with a "known good" device. This is simply any device that you know for a fact is working, like your phone charger or a small fan. Plug it into the exact same socket the lamp was using. If it doesn't work, you've found your culprit, and it has nothing to do with your lamp. If the device does work, then you have successfully confirmed the outlet is providing power, and you can move on to the next step in the troubleshooting process.
Check the Complete Power Path
Don't just think about the wall outlet. Think about the entire path the electricity takes to get there. Is the lamp plugged into a power strip? Many power strips have their own on/off switch and their own built-in circuit breaker that can trip. Is the outlet itself connected to a wall switch, perhaps one by the door you never use? It's easy to flip one by accident.
| Troubleshooting Step | Action to Take | What a "Good" Result Means | What a "Bad" Result Means |
|---|---|---|---|
| 1. Outlet Test | Plug a working device (e.g., phone charger) into the lamp's outlet. | The device powers on. The outlet is fine. | The device does not power on. The outlet is the problem. |
| 2. Power Strip Check | If using a power strip, ensure its switch is on and its breaker is not tripped. | The strip is on and other devices in it are working. | The strip is off or not providing power. The strip is the problem. |
| 3. Wall Switch Check | Check for any nearby wall switches that might control the outlet. | All relevant switches are in the "on" position. | A switch was off. The outlet was simply switched off. |
| 4. Breaker Box Check | Check your home's main circuit breaker box for any tripped breakers. | No breakers are tripped for that room/area. | A breaker was tripped. The circuit was overloaded. |
Is the Power Cord or Adapter the Point of Failure?
You've confirmed the wall outlet has power, but your lamp is still dead. You feel a sinking feeling, worried that the expensive, integrated part of the lamp has failed.
The power cord and its AC adapter are the most handled parts of the lamp and are a very common failure point. Physical damage to the cord or a failure of the adapter's internal electronics can stop power from ever reaching the lamp.
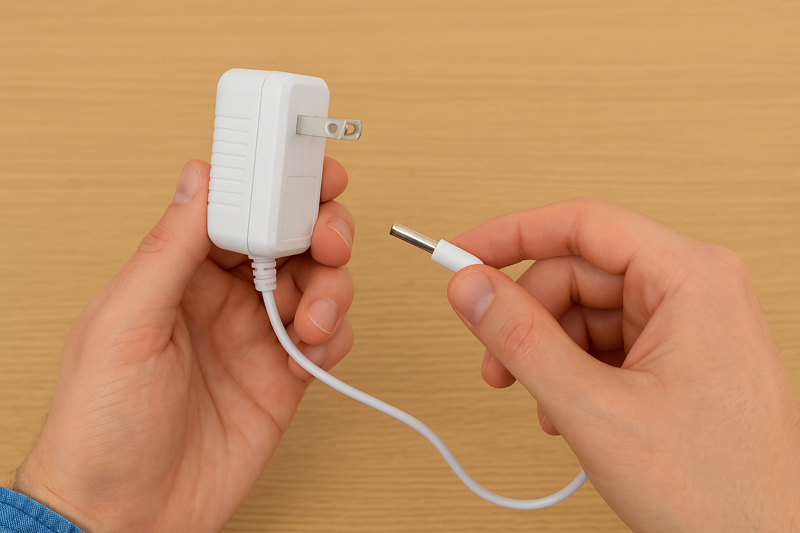
The AC adapter—that blocky plug that goes into the wall—is not just a plug. It is a complete, miniature power supply. Its job is to take the high-voltage AC power from your wall and convert it into the low-voltage DC power that the sensitive electronics in your LED lamp need to function. As a manufacturer, we know that this adapter is one of the most critical components for the lamp's reliability. It’s also the part of the lamp that gets kicked under the desk, pinched behind furniture, and constantly plugged and unplugged. This physical stress can cause the thin wires inside the cord to break or the connection points to become loose. The electronics inside the adapter itself can also fail, especially if it's a lower-quality unit that overheats. Before you declare the lamp itself dead, you must give this cord and adapter a thorough health check.
A Full Physical Inspection
Start at the adapter block and slowly run your fingers down the entire length of the cord, all the way to where it plugs into the lamp. Are there any sharp kinks, cuts, or areas where the outer insulation is frayed? Do you feel any bumps or abnormalities? Pay close attention to the "strain relief" points, which are the flexible rubber areas where the cord enters the adapter and where it enters the lamp base. These are the points that bend the most and are most likely to fail.
Check the Connections and Adapter Itself
Make sure the adapter is pushed firmly into the wall. Then, check the connection point on the lamp itself. Sometimes this is a small barrel-style plug. Unplug it and plug it back in to ensure it's making a solid connection. Finally, check the adapter block. Is it unusually hot to the touch? Does it make any buzzing or humming noises? A well-designed adapter may be warm during use, but it should never be hot, and it should be silent. Any of these signs point to the adapter being the likely point of failure.
| Component Check | What to Look For and Feel For | What a Problem Signifies |
|---|---|---|
| AC Adapter Block1 | Excessive heat, humming or buzzing sounds, any discoloration. | A potential internal electronic failure. The adapter needs replacement. |
| Power Cord2 | Sharp kinks, deep cuts, frayed insulation, bite marks from pets. | A break in the internal wires. The power cannot get through. |
| Connection Points | Wobbly or loose fit at the wall, the adapter, or the lamp base. | A poor electrical connection; power is intermittent or non-existent. |
| Strain Reliefs | Cracks or visible damage where the cord bends at each end. | A very common point of internal wire breakage from stress. |
Could It Be a Simple Switch or Control Issue?
So, the outlet is good and the cord looks perfect. When you press the on/off button, nothing happens. It's easy to assume the very heart of the lamp has burned out, right?
The switch is the part of the lamp you interact with most, and this constant use can lead to mechanical or electronic failure. A stuck physical button or a dirty touch sensor can prevent the lamp from receiving the "on" command.
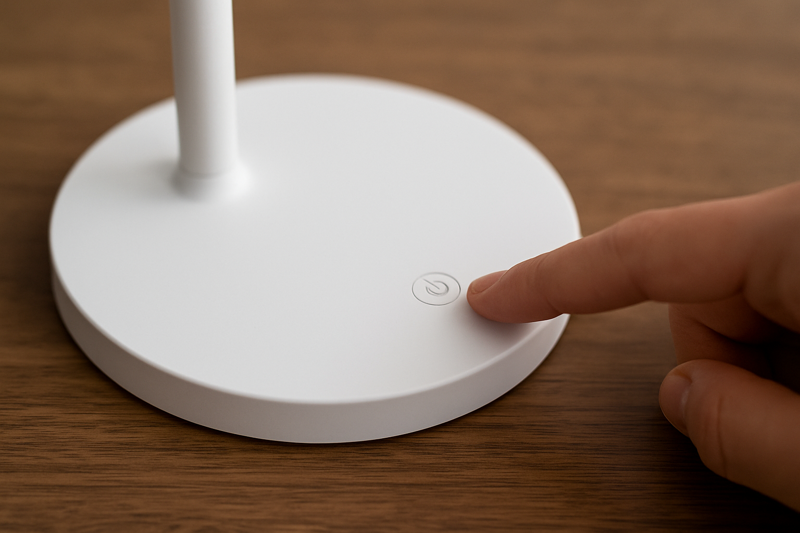
Every time you turn your lamp on or off, you are using the switch. If it's a physical button, you're pressing a small mechanical device with moving parts. If it's a touch sensor, you're interacting with a sensitive electronic circuit. At our factory, the switches we use are durability tested for tens of thousands of cycles, but in a lower-quality lamp, this is often one of the first components to fail. The problem is often fixable, or at least diagnosable, with a few simple tests. Since the LEDs themselves have an incredibly long lifespan, it is more statistically likely that the part you touch every day is the problem, not the light source itself. Trying to understand how your specific switch works is the key to figuring out why it might be failing.
Mechanical Switches vs. Capacitive Touch Sensors
A traditional mechanical switch3 works by physically connecting two pieces of metal when you press it. Over time, the internal spring can weaken, or the contacts can get dirty, preventing a good connection. Try pressing the button a few times. Does it feel normal? Does it "click" like it used to, or does it feel mushy or stuck? Sometimes, pressing it firmly or repeatedly can re-establish the connection. Capacitive touch sensors are more complex. They work by detecting the tiny electrical charge in your body. When you touch the sensor, you change the electrical field, and the lamp's circuit registers that as a command.
Troubleshooting Touch Controls
Because touch sensors are electronic, they can be a bit more finicky. Their biggest enemies are dirt and moisture. A greasy fingerprint or a drop of water can be enough to interfere with the sensor's ability to detect your touch. The first thing you should always do is unplug the lamp and gently clean the entire control surface with a soft, dry cloth. You can also try a "power cycle reset4." Unplug the lamp, wait for a full minute to allow the capacitors in the sensor circuit to completely discharge, and then plug it back in. This can sometimes reset the sensor's logic and restore its function.
| Type of Switch | Common Problem | Simple Troubleshooting Steps |
|---|---|---|
| Physical Push-Button | Internal mechanism is stuck or worn out. | Press the button firmly multiple times. Listen for the "click." Try wiggling it gently. |
| Physical Rocker Switch | Contacts are dirty or worn. | Flip the switch back and forth a dozen times to help clean the internal contacts. |
| Capacitive Touch Sensor | Surface is dirty, oily, or wet. | Unplug the lamp and clean the sensor area thoroughly with a dry microfiber cloth. |
| Capacitive Touch Sensor | Electronic logic is "stuck." | Unplug the lamp from the wall for 60 seconds, then plug it back in to reset the sensor. |
What If the Lamp Itself Has Actually Failed?
You have tried everything. The outlet works, the cord is pristine, the switch feels fine, but the lamp remains stubbornly dark. This is the moment when you have to consider the possibility that the lamp has indeed failed.
If all external factors are ruled out, the failure is almost certainly an internal electronic component: either the LED driver (the power supply board) or, far more rarely, the LED chips themselves have failed.
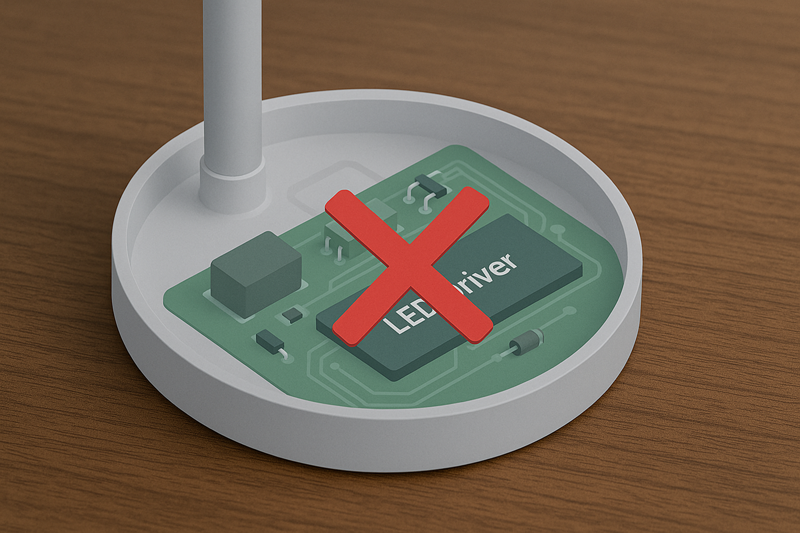
As a manufacturer, I can tell you that when a modern, integrated LED lamp fails prematurely, the cause of death in about 90% of cases is the driver. As we've discussed, the LED chips themselves are incredibly robust and have a lifespan of up to 50,000 hours. They almost never just "burn out" like an old bulb. But they are powered by that internal circuit board, the driver, which is a complex electronic component. The driver is filled with smaller, more fragile components like capacitors, resistors, and transistors. The number one enemy of these components is heat. A well-designed lamp, like the ones we build, will use the metal body of the lamp as a "heat sink" to draw heat away from the driver and the LEDs. But in a cheaply made lamp, especially one with a sealed plastic body, this heat has nowhere to go. It slowly cooks the driver's components over time until one of them fails.
The Driver vs. The LEDs
A failed driver will simply stop delivering the correct power to the LED board, and the lamp will go completely dark. A failure of the LED chips themselves is much less common and usually looks different. It often starts with a single LED or a small section of LEDs flickering or changing color. A total, sudden failure of all the chips at once is exceptionally rare. So if your lamp was working perfectly one day and is completely dead the next, the driver is the most likely suspect.
Is It Repairable?
For the average person, a failed internal driver is not a DIY repair. It would require disassembling the lamp housing, de-soldering the old board, sourcing an exact replacement driver, and soldering the new one in place. For most lamps, this is not practical or safe. This is the point where the lamp's journey has likely come to an end. However, this knowledge is power. When you buy your next lamp, you can now look for features that point to quality and longevity, such as a sturdy metal construction (for heat dissipation) and a good warranty from a reputable brand.
| Internal Component | Likelihood of Failure | Common Cause of Failure | Visible Symptoms |
|---|---|---|---|
| LED Driver Board5 | High | Overheating due to poor design; failure of a single capacitor or resistor. | Lamp is completely and suddenly dead. No light at all. |
| LED Chip Board6 | Very Low | Overheating; a massive power surge. | Often, only one or a few LEDs will flicker, change color, or go out. A total failure is rare. |
| Internal Wiring | Low | A poorly soldered connection from the factory finally breaks loose. | Lamp might flicker when moved before failing completely. |
Conclusion
By logically checking the power source, cord, and switch first, you can easily solve the most common issues with any lamp.
-
Understanding the signs of a failing AC adapter block can help you prevent potential electrical hazards and ensure device safety. ↩
-
Identifying issues with a power cord is crucial for maintaining device functionality and safety, preventing electrical failures. ↩
-
Explore the benefits of mechanical switches, including durability and tactile feedback, to understand their applications better. ↩
-
Understand the concept of power cycle reset and its importance in resolving electronic device issues. ↩
-
Understanding LED Driver Boards can help you make informed decisions when purchasing lamps, ensuring better quality and longevity. ↩
-
Exploring LED Chip Boards will provide insights into their reliability and help you identify potential problems in your lighting. ↩
